The Launcher
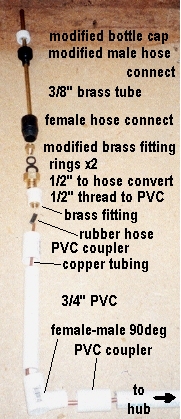
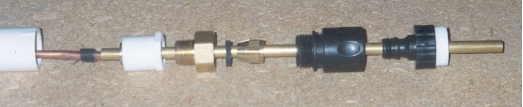
The launcher is the real peice of work here. My launcher incorporates many of the top of the line ideas in the hobby. It is able to fill the rocket with water while it's on the launch pad. I used common plumbing parts and the total price of just the launcher was less than $50. The actual connection and launch point uses a garden hose quick disconnect and utilizes a booster rod. This rod allows the rocket to break its static friction and keep the rocket stabilized during the first critical moments of launch. All this without losing any water or pressure. The length of the rod is limited to allow for a standard 16oz bottle and was made to be replaceable in the event it got bent.To the right is the actual pad of the launcher before I put it together. The male hose connect had its threading ground out to allow a bottle cap to be glued into it. The bottle cap then had a hole drilled into it and that is what will go on our rockets. The brass rod fits onto the copper tubing which will extend its length. The brass fittings you see actually hold the rod tight and the rubber hose slid onto the copper tubing limits how far into the thing it can be pushed. One of the brass fittings was modified to allow water past it and a ring had to be added to keep it centered. Here's another picture of things coming together
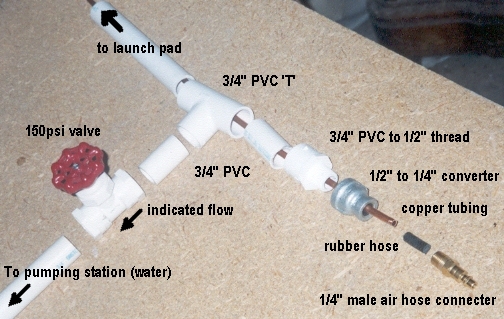
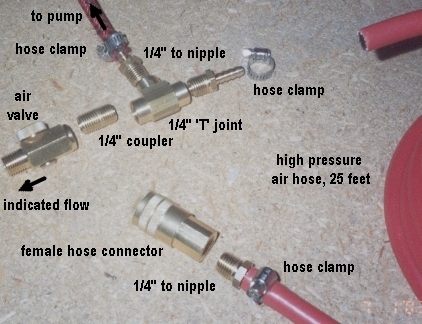
The hub of the launcher gives it stability and splits out to our 2 fuel sources, water and air. For air, the copper tubing runs all the way from the top of our booster rod to the air hose connector. The tubing is held tight in the connecter by the rubber hose. This connection should be as water tight as possible to keep water from getting into our air supply, but it doesn't need to handle any high pressure since the air pressure in the copper tubing will match the water pressure outside it. For the water part, A valve separates the system from the pumping station. This is because the pump will not be able to handle the pressure. Do note that even though our water will be pumped into the system, the indicated flow on the valve should be pointing in the opposite direction. This is because when we start pressurizing, the system will be the source we want the valve to keep from escaping.
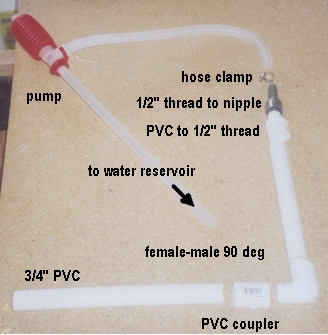
The water pumping station comes off the hub and into a 90 degree turn upwards. The height is such that it is about the same as what the water level will be in typical rockets (but really doesn't need to be). I found the pump at a hardware store and it was marked as a kerosene pump used to move the fuel to heaters, laterns, and camping gear. It works great for pumping water. We usually set it in a bucket when it is operating.
The air supply is connected to our system via a typical air hose quick connect. A bicycle pump with a 100psi guage on it is used for our pressurizing. It is coupled to the hose with an air valve that serves 2 purposes. It allows air to escape while pumping in water and it also acts as an emergency release in the event that an aborted launch occurs. A board is brought to the launch site to set the pump on.
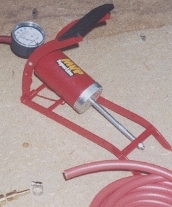
(update: air pump is no longer physically tied to the system. A brass valve not unlike a tire valve now allows any pump to be used)
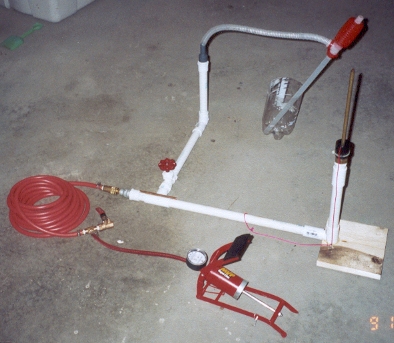
Here is a final picture of the whole thing. A board was glued at the bottom of the launcher for stability and to allow nails to be used in fastening the pad to the ground. You can also see the pink neon string that was glued to the quick disconnect looped through some eyelets to allow us to let the rocket go from a distance.
Typical Launch Sequence With Above Launcher
back to main page