Things you need and need to know
You may want to read the concept portion of this site to get background on the game.As stated, this game is driven by .gif files. Thus you will need a graphics program that is able to create .gif files. The better you are using your graphics program the better and easier to design your games will be. Recall that in designing images and programs, the point 0,0 is in the upper left corner of the image and increases positively to the right and down. You will also need to know a very tiny bit of HTML coding (and maybe some JavaScript).
As you design your own, it is very helpful to see examples. I currently have several examples in the offline zipped package. With these you can see the parts and how they work:
pinball.zip
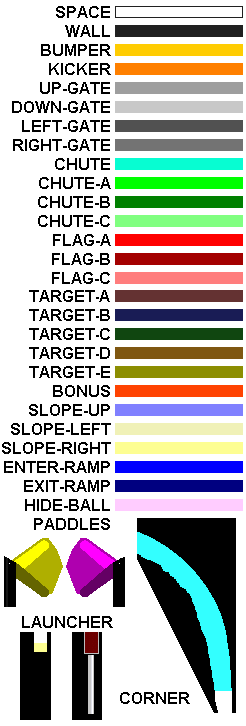
The file contains everything you need to run the pinball games offline including the jar file that is the applet. I would also recommend right clicking the image to the right (tool.gif) and saving it for reference.
Let's talk about that image on the right. Remember, the game is controlled by colors, and you have to be exact with them. Use this tool as a paint board to properly select the color you need. Also the bottom has some guides to directly cut and paste into your images.
The HTML
As there are 2 ways to run the applet, there are 2 HTML files. It is helpful to have another document to explain your game that people come to first. This is index.html that was in the zipped file.What we need to decide first is the dimensions of your game. Remember not everyone on the internet has a large high resolution monitor. I suggest staying in the range of 300x500 pixels for the dimensions of the game. For this tutorial, we will use 300x500.
Let's look first at index.html. Notice the code I have between the 'head' tags:
<SCRIPT LANGUAGE="JavaScript">
<!-- hide from none JavaScript Browsers
function turnon()
{open("pinball.html","Pinball","height=550,width=350, hotkeys,screenX=1,screenY=1,status=yes")}
function turnon2()
{open("pinball2.html","Pinball","height=550,width=350, hotkeys,screenX=1,screenY=1,status=yes")}
// - stop hiding -->
</SCRIPT>
What this allows us to do is open a new window with no fancy buttons, just our game. Note the width and height values, you will need to change these to make sure your game fits. Now when coding the links to the 2 different games, we use the following HTML:
Click <a href="javascript:turnon()"; return true>HERE</a> to run the version with...
Click <a href="javascript:turnon2()"; return true>HERE</a> to run the muted version...
The rest is basic HTML, and you can use my index.html as a guide to yours.
Now let's look at the code of pinball2.html, particularly the applet part:
<APPLET CODE="Pinball.class" ARCHIVE="Pinball.jar" WIDTH=300 HEIGHT=525> <PARAM NAME = "leftmain" VALUE ="97/456">
<PARAM NAME = "rightmain" VALUE ="207/456">
<PARAM NAME = "rightsecond" VALUE ="234/334">
<PARAM NAME = "gate1" VALUE ="115/72">
<PARAM NAME = "gate2" VALUE ="142/72">
<PARAM NAME = "gate3" VALUE ="168/72">
<PARAM NAME = "flag1" VALUE ="209/62">
<PARAM NAME = "flag2" VALUE ="222/80">
<PARAM NAME = "flag3" VALUE ="233/97">
<PARAM NAME = "spot" VALUE ="68/262">
<PARAM NAME = "sound" VALUE ="off">
<PARAM NAME = "testmode" VALUE ="on">
<APPLET>
This is your basic applet call. You will need to change the width and height in the first line (NOTE: add 25 to the height of your game, 500+25=525, this will leave room for our score board). Each parameter will also need to change depending on the design of your game. The values in the form of number/number represent X and Y values of the component named. If you are not using a component, don't list it (ex. leftsecond). Note for this muted version the sound is switched off, and we also have testmode set to on. While in test mode the game starts out with 6 balls. This is helpful in troubleshooting.
Pinball.html is coded differently as it utilizes the JRE plugin. I generated this code using a utility called HTML Converter that Sun has available on their site. Looking at mine, though, you should be able to tell what goes where. Look specifically for widths and heights and parameter names/values that may need changing.

Designing the Board
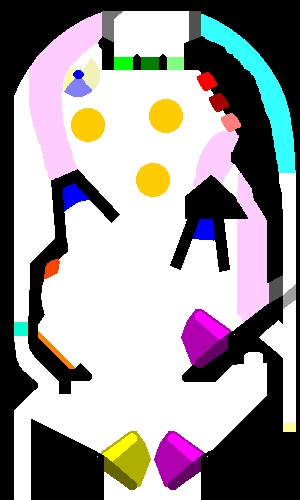
When designing the game it is very helpful to keep board.gif and display.gif the same. This allows you to see how the ball reacts with the image.To make sure you have the correct color palette and such, I would advise opening tool.gif, resize it to the size you want your game to be, white out everything, and then save as board.gif. Now you know that board.gif is a .gif file with the correct color palette.
The Launcher
To create the launcher, we go to our helpful tool image. On it are 2 launcher images, select and copy the left one. Now paste it into your board in the lower right corner. Position for the launcher is VERY important. You want to make sure the black sides of what you are pasting fit into the corner exactly. The second image on the tool is for the display and we will use that later.The Corner
Because the applet uses an image for it's key, it's a granular world to say the least. In other words there are no smooth curves. This was a problem because I wanted my games to have the generic banking corner the ball encounters after being launched. This required special code to fix. On the tool is an image of the corner. Copy it to your board.gif and put it in the upper right corner. You can modify it if you want, but mine works quite well. For your information if you choose to change it, the light blue color tells the ball to always bounce off a wall heading 45 degrees left of center (NW) and don't slow the ball due to a wall collision. This code only kicks in when the ball is going up the ramp. If it loses speed, it will successfully bounce back down it.The Paddles
The tool has on it how the left and right paddles should look on your board.gif. Once again copy and paste away. It is important that the paddles not be placed too low in your game, such that the black part of their image is falling off your board. You can also add secondary paddles (one for each side) using the same color scheme. For the typical bottom 2 paddles, you can try different spacing, but the spacing in the tool seemed very realistic. Do make sure the area above them is free from other objects since the ball initially breaks the speed limit when coming off the paddles. By this I mean it travels higher than I allow anywhere else in the game, see the discussion on the walls for more information on this limit. Note the white pixel at the paddles base among the black. Once pasted into your image, note the X,Y position of that pixel. This information must be put in your pinball(2).html under the parameters for each paddle (rightmain, rightsecond, leftmain, leftsecond). If you don't use a paddle there is no need to list it in the parameters.Walls
As the guide tells you, walls are designated by the color black. Walls should be made 10-13 pixels thick depending on where they are used. The reason behind this is that the ball has a speed limit of movement of 9.9 pixels per frame shown(it may have a speed over the limit, but only the limit is shown). This is because our ball is only 13 pixels in diameter. Remember that the game is constantly monitoring 12 spots around the ball waiting to detect a wall. If a wall is too thin, the ball might blow right through it. You will notice on my board.gif that they are quite thick and bulky looking. This was done on purpose. Now, walls may be thinner in areas where you know the ball speed will be low. This can be seen along the chute on the right side. I am assuming another wall will be placed along the left side of the launch area like most pinball games. Thus no ball will ever be hitting the wall at 90 degrees at full speed. Also, because of this same phenomena, corners should be rounded and not necessarily pointed. This helps in keep the ball from doing weird stuff around them.A good next step for your board is to draw the thin wall from the launcher to the corner, and then draw a thicker line along the top and left side of your board. Also draw in the thick wall on the left side of the launcher from the plunger up to the start of the corner. You may also try some stuff on the bottom by the paddles. Save your board as board.gif and display.gif and then you are ready to try out your game to see how it is doing.
Gates
Gates allow the ball to go through them in one direction, but act as a wall in the opposite. For these you should also make thick for when they act as a wall. I have seen the ball get stuck on rare occasions near gates. Unable to fix the problem in the code, I redid my board. If you notice the upper left gate by the chutes on my board, I added a chunk of grey to it on its right side. This was because the ball would occasionally stick here. After the change, I never saw it happen again. Note for Advanced Users: Currently there is no down-gate modeled and several changes would need to be made to implement the idea. To get around this I have used the idea of ramping (discussed below) to accomplish this. So I basically put a wall that the ball can drop off going down, and then bounce off going up. This is done without the player even knowing they entered a ramp.Bumpers and Kickers
Bumpers and kickers both knock the ball away from them at a speed slightly higher than the speed limit. Along with paddles, walls and gates, bumpers and kickers are items checked for in the 12 spots around the ball (every other color is based on the pixel at the center of the ball). The difference between the 2 is that bumpers throw the ball away from them perpendicular to the striking surface. Kickers on the other hand let the ball reflect symmetrically, but give it full power in its new direction. Because of this, it is advisable to not put walls and other strike objects too close to these.The Cover Image
The graphic image.gif (shown on the right in real size and magnified 3x) is used to cover lights in the game. On the display these lights/indicators are actually drawn 'on'. The cover is used to hide the light when it has turned off. In my case the covers are really black pixels with the rest being transparent. That way when the cover covers a light, you can still see the light, it just looks dim. Your cover could be any shape or color. More on this when we discuss the design of display.gif. I brought it up here because it is necessary in the discussion of flags, chutes, and the bonus.Flags
Flags are objects that when struck, activate and stay active till all 3 are hit. Then they will reset after giving you a nice score. In normal pinball games, these are usually yellow squares along walls that fall into the game when struck. I use them in my games pretty much the same way, placing them adjacent to walls. A hit on the flag is determined by the middle pixel of the ball, so make sure they extend some from the wall (as in my board). When a flag is hit, the cover.gif that was associated with it is removed and the player can see they hit it. To associate a flag with where its cover/indicator is, you must change your param values in your HTML. The number is the X and Y location of cover.gif's upper left corner when displayed in the game. This point has to go along with where the indicator is drawn in display.gif. More later on designing the display. Flags are not needed to play the game, but are nice to add in a boring spot along a wall.Targets
Targets act just like flags except for a few things. Unlike flags, targets are scored everytime they are struck and are always available to hit. In the case of this applet there are 5 targets. When all 5 are hit in the course of a turn, a hefty score is given and they are reset. These do not have any indicators like flags. Several pinball games have these scattered all over the place to fill up wall space. You may also use these as a bank of 5 flags, but remember they do not have any indicator and do not act like flags.Chutes
Chutes are devices that work a lot like flags except for 3 things. First, the ball rolls over a chute, unlike a typical flag. Second, a ball rolling over a chute toggles it's indicator. Third, the light/indicator is controllable through paddle input. If you have ever played real pinball, you have seen these. They are usually near the top of the game and have 3 letters associated with them. Get all 3 letters lit and you advance somehow in the game (in our case, multiplier is increased and the bonus is activated). Hitting the right or left paddle will advance the letters in that direction. Make sure when drawing the chutes, that you make the color wide enough that the ball activates it. A thin line may allow the ball to skip over it with out activating it. Each of these chutes also has a cover associated just like the flags. In your HTML applet parameters these are listed as gates 1-3. The chutes described above pertain to chutes A, B, C on the tool. There is also a plain chute color code. This is something that gives the player some points whenever it is crossed. A lot of pinball games give you points just for getting the balls somewhere, like up a ramp or through an obstacle. This is what this chute is used for.The Bonus
The bonus also has the cover.gif image associated with it (listed as spot in your applet HTML). The bonus is active when you start a ball or when the multiplier is increased (through the use of the chutes). Once struck, the bonus becomes inactive again. When the bonus is inactive, its cover will be displayed over some sort of indicator you draw into your display.gif (more on this later). A bonus may be put anywhere the middle pixel of the ball crosses. You could put it along a wall (like mine) or in the middle of the playing field.
Designing Ramps/Tunnels
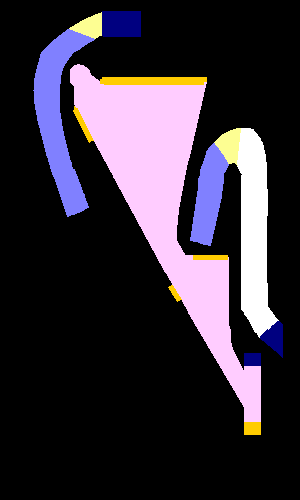
The ramps.gif image is used in the same way as board.gif. The game, through color codes, knows which of these 2 keys to use.Entries and Exits
Entering and exiting the ramps are detected by the colors indicated in the tool image. When the game detects that the ball has hit the enter-ramp color, it stops using board.gif as the key and instead uses ramps.gif. The opposite occurs when the exit-ramp color is touched. Thus your ramps and board images need to work closely together. I draw my ramps by copying board.gif and then drawing in the ramps and blacking out everything else. Note for Advanced Users: The ramp idea can also fix some ball embedding problems near the paddles. As stated, the ball comes off the paddles greater than the game's speed limit and will occassionally embed into a wall near the paddle with weird results. What you can do is put a tunnel entrance beyond the wall and then design your ramp image to redirect the ball back into play. If by chance the ball embeds into the wall, it will then enter the ramp and roll back onto the board, unbeknownst to the player.Hiding the Ball and Tunnels
Now, when a ball goes under a ramp, you don't want to see it. To hide it you will need to use the hide-ball color from the tool. Quite simply, anytime the ball encounters this color it is not displayed. This is normally used on the board.gif image. However it can be used on ramps.gif to simulate tunnels. Tunnels work just like ramps and use the same controlling image, except the pink hide color is used to keep them hidden. The wide middle area on my ramps image is an example of this. I made the tunnel wide with a few kickers to get the ball through it faster. The ball's last motion is upwards as it bounces off the bumper at the bottom to pop back into view and out of the 'ramps'. When designing this tunnel, it was helpful at times to not hide the ball (use white instead of pink), so I could see what path the ball actually took.Slopes
The game is always sloping down. However whenever the 3 sloping colors are detected, this changes. I designed the slope coding to help in moving the ball through ramps. I had to find a way to make the ramp go downhill and the code uses the colors to accomplish this. You will also note that the tunnel entrance near the upper left of my board.gif has these sloping colors around it. This causes the ball to take a curved path near the 'hole' as if it was circling around the rim of the hole. Note for Advanced Users: Previously it was mentioned to avoid near horizontal surfaces to avoid the ball hanging up there. However, these low angle surfaces are possible using the slope idea. What I have done is put a slope in front of the wall, so that a ball sitting on the gentle slope will be pushed down it. However, the effect did not look right until I actually drew verticle lines separated by 1 or 2 pixels in the slope color. This slowed down the movement of the ball so it didn't look like it was shooting off the slope.
Drawing the Art Work
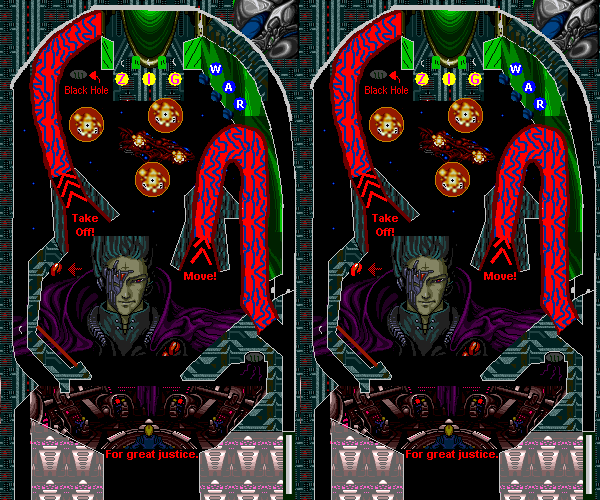
Everything we have drawn so far (except maybe cover.gif) was hidden from the player view. Now it is time to design what the player actually sees. At the left is my display.gif. Notice that the paddles are not drawn and all the indicator/lights are on (flags W-A-R, chutes Z-I-G, bonus arrow). The easiest way I have found to draw the display is to use layers. Most of the common graphics programs allow layers. Previous to designing this game I had never used layers, but found them self explanatory and easy to use. Basically I made board.gif as the background and then drew in the display on a layer above it. Then when I was done, I scraped off the new layer and saved it as display.gif. Do note the blinking bonus area. Applets will display animated .gif files as this one is. They take longer to download, but may spice up the look of your game. If you can't draw very well, cutting and pasting from other sources works great (as I have done). As for completing my display, I usually outline the walls and other objects and then fill in the voids.Here you can use the second image of the launcher from the tool. This will help you line up and design how your plunger looks. When using the plunger in the game, part of it is blacked out and it appears to be going down and then shooting up.
Other Things
Here are some other things you can change if you like.
Other Images
The flippers and the ball are also customizable by the designer.


It is important that these images all utilize a transparent background.
Only change these if you know how to modify transparency.
My first images used a shareware program that made images transparent for you.
These worked fine when being displayed on web pages, but for some reason would not show in the game every time.
Once I produced these images from a well know graphics program, the images displayed every time correctly.
The paddles and ball that I have here were designed to look like the traditional ones.
Sounds
Yes, the sounds are also customizable.
When making your own .wav files, I suggest saving them at the lowest quality and mono.
This keeps them small and download a lot faster.
Here is a quick guide of all the sounds used (examples in my offline games zipped file):
Utilizing High Score
To be able to add the high score ability to your game you need to have a cgi-bin on your web server that can run Perl scripts. If you are unsure, you may want to contact your server admins to find out. When the game starts it reads a text file (highest.txt) in from the server that has the current high score and its owner. If a score is reached higher than the high score, a box will pop up and prompt for the name of the player (no spaces allowed). The applet will then make a call to the Perl script which will write out the information to the previous mentioned text file and the index page for the game. It is very important to note that when you set up to use high score, the applet will only work from the server, so you will not be able to test it on your PC. Therefore this is something that you want to set up last. First thing you will have to do is download the Perl script and the default high score file:pinball.pl
highest.txt
The script has 2 variables that need to be defined: $basefile and $scorefile. These tell Perl which 2 files to change when a high score is achieved (more than likely highest.txt and index.html). Do note that these are not internet locations, but the location on the server which these files reside. I keep them in the same folder. After changing the file (as a UNIX text file) move it to your cgi-bin on your web server and also use highest.txt for your initial high score file.
You will also need to add 2 more parameters to your applet HTML code. NOTE: by adding these 2 params, you will not be able to run the applet from your PC without being online, and even then you will not be able to read the highest.txt file. The inputs tell the applet where to find the text file with the highscore information and also what Perl script to call if high score is achieved. They should look something like this:
<PARAM NAME = "scorefile" VALUE = "http://www.yourdomain.com/userid/pinball/highest.txt">
<PARAM NAME = "perlfile" VALUE ="http://www.yourdomain/userid/cgi-bin/pinball.pl">
Both the Perl script and the text file can take on different names if you like. The high score text file must be located in the same directory as your applet, though. What this allows you to do is have multiple games. The key will be to have one folder for each game with its own applet and text file, along with a separate Perl script for itself.
Final
In closing, good luck in making your dream pinball game. When you get one up and working on a server, please let me know and I will link you from the main page.errthumt(at)radiks.net