Homemade Rudder Pedals
Background
I made these rudder pedals in 1997 to play Warbirds 1.11 with. Wanting the true experience of flight, I knew I needed good rudder control. However, being the cheap bastard I am, I made my own based off of several others I found on the internet. As a matter of fact do a search on the internet and you will find many writeups like this one. These are still in use today with my analog TM TopGun joystick, but will soon be hooked up to the TM Cougar.Construction
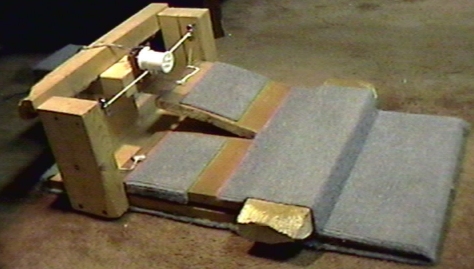
I made this with scraps of wood I found at a relative's house and with a few other items I bought. Keep in mind this is not a strict design, get inventive. There is a lot I could do to improve this, make it simpler, or more compact. One thing I did not add were any springs to center the pedals. Because the pedals are so close to each other, I just make them even and I know they are centered. Here is the side view, note the added carpeting for foot comfort and floor protection, and the placement of the hinges.
 You may notice the area in front of the pedals is extended further than needed.
Once carpeted, this area gives me a nice place to rest my feet when sitting up straight.
The unit is thin enough also that when I slouch down my feet are placed on either side.
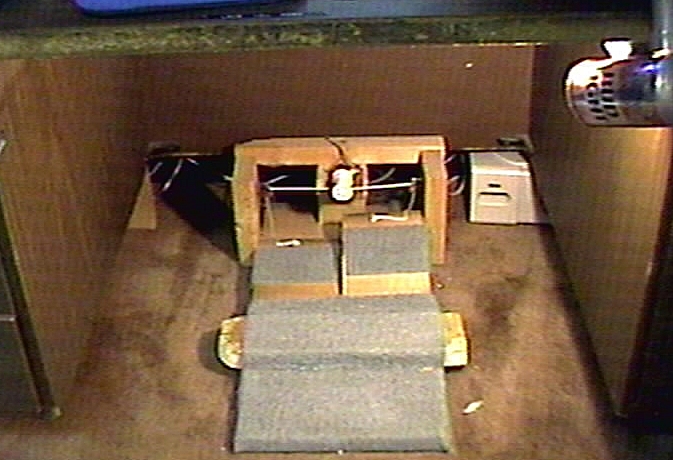
Now lets look at the thing head-on.
As you can see the pedals pull on a string that is looped around a spool via pullies.
We will get more detailed on the spool and circuit down the page further.
You can click on the image at the right for a larger image.
The Bud-Light can you see is part of lamp I made, ignore it. :)
You may also notice on the sides, that my dog used it when she was teething.
Note the placement of the pullies in the diagram.
You may notice the area in front of the pedals is extended further than needed.
Once carpeted, this area gives me a nice place to rest my feet when sitting up straight.
The unit is thin enough also that when I slouch down my feet are placed on either side.
Now lets look at the thing head-on.
As you can see the pedals pull on a string that is looped around a spool via pullies.
We will get more detailed on the spool and circuit down the page further.
You can click on the image at the right for a larger image.
The Bud-Light can you see is part of lamp I made, ignore it. :)
You may also notice on the sides, that my dog used it when she was teething.
Note the placement of the pullies in the diagram.
Electronics/Misc.
 You can click on the image at the right for a larger image with everything labeled.
Basically, what we have here is a generic circuit board (board with little holes in it for electronic components, via Radio Shack).
I drilled a hole in it for the pot.
IMPORTANT NOTES ABOUT THE POT--
The pot must be a 100k ohm linear.
Linear is important, a lot of pots are audio, we don't want that.
My advice on the purchase of the pot is to buy expensive.
I don't remember where I bought mine, but it was not Radio Shack and it cost me over $20.
Pots will go bad, but mine has never needed replacing since I started using it in 1997 (and only needed cleaning twice w/tuner cleaner).
Also, look for one with a long shaft.
In the picture on the right, You may notice some other electrical components.
These are unneeded as I was experimenting at the time. :)
I soldered on 2 leads from some speaker wire to the pot, attaching one lead to the center of the 3 posts on the pot.
Take a guess at the other, if your rudder works backwards later, switch it. :)
You can click on the image at the right for a larger image with everything labeled.
Basically, what we have here is a generic circuit board (board with little holes in it for electronic components, via Radio Shack).
I drilled a hole in it for the pot.
IMPORTANT NOTES ABOUT THE POT--
The pot must be a 100k ohm linear.
Linear is important, a lot of pots are audio, we don't want that.
My advice on the purchase of the pot is to buy expensive.
I don't remember where I bought mine, but it was not Radio Shack and it cost me over $20.
Pots will go bad, but mine has never needed replacing since I started using it in 1997 (and only needed cleaning twice w/tuner cleaner).
Also, look for one with a long shaft.
In the picture on the right, You may notice some other electrical components.
These are unneeded as I was experimenting at the time. :)
I soldered on 2 leads from some speaker wire to the pot, attaching one lead to the center of the 3 posts on the pot.
Take a guess at the other, if your rudder works backwards later, switch it. :)
After the circuitry was done, I attached the thread spool to the pot shaft. The way I did this was I found a spool that was too small and then drilled a hole that was just big enough for the shaft. After shoving the spool on, I drilled a hole through the spool and the shaft and shoved a small paneling nail into it for a pin. The whole circuit board was screwed onto the main unit inline with the pullies. I made one loop around the spool with the string and then went around the pullies and staple-gunned them to the hinged pedals. The nail I used as a pin was useful here to stab the loop of string around the spool. This kept it from ever slipping.
PC Connection
So, I had my rudder pedals with 2 leads of speaker wire that I needed to hook up to my PC. Those 2 wires had to be connected to pins 9 and 11 in the 15 pin joystick port on my sound card. Because my joystick needed to plug into that same port, I had to somehow split those 2 ports out. To accomplish this I built a splice using male and female 15 pin plugs from Radio Shack. Click on the picture at the right for a bigger, labeled image. Basically for all the pins, except 9 and 11, I just ran a wire from the femail plug to the equivalent male pins. It is advised you get the plugs with the screws that fasten them in place. Here is the pinout diagram to help you locate the correct pins.
Finish
You should be able to activate, test, and calibrate your rudders through Window's setup. If they work in reverse, flip the speaker leads around at the plug or on the unit.UPDATE: These now work well on my Cougar.
Keyboard
I thought I would put this here also. The keyboard I use is awesome for gaming and online gaming in general. I got it from an old Pitney Bowes shipping system. It is a compact keyboard with the keys smaller and closer together. This allows for quicker typing and less desk space taken up. What is also unique is the keys have clear caps on them, allowing them to be labeled. When I first started playing Warbirds, I could never remember which keys did what. Neither could my friends. So I labeled the keyboard with each key's function. You can click on the picture for a detailed look.